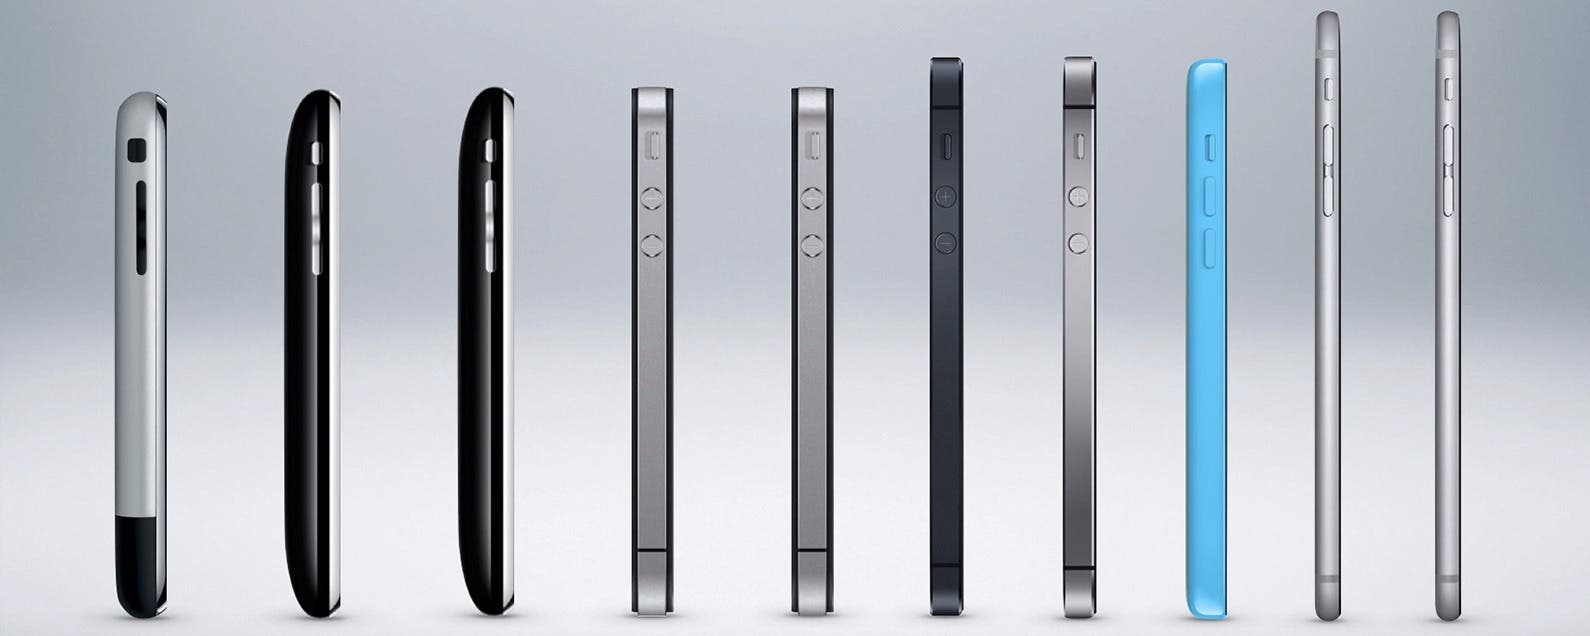
How to get started with your new Mac, so you can enjoy it from THE FIRST day.
In this handy guide, we’ll take you through initial setup; teach you some awesome tweaks that’ll enhance your OS X experience; introduce you to some of the best apps the Mac has to offer; and tell you about some great accessories that you just shouldn’t be without.
Here’s our guide to setting up your new Mac the right way.
Initial Setup
![Get Started With Your New Mac – The Right Way [Setup Guide]](https://i0.wp.com/cdn.cultofmac.com/wp-content/uploads/2011/12/2948959526_753bafc515_z.jpg "2948959526_753bafc515_z")
You’re not going to have too many problems setting up your Mac initially. Simply attach the power cord and any USB peripherals you may have and you’re ready to go. However, we recommend that when you originally unbox your new Mac, you make sure to take pains not to rip the original box, and don’t throw it away.
Why? If something ends up being wrong with your Mac – whether it’s defective or an incorrect model – you’re going to need its original packaging (provided you’re still within Apple’s return policy period). In addition, you should make sure to inspect your Mac for any obvious defects or damage, and also save the date so you know when your warranty will end. For more initial unboxing tips, please check out our article here.
Once you’ve connected all the power cords, Macs are pretty painless to setup, largely thanks to a program that launches when you first set it up called Setup Assistant, which guides you through the process of getting started on your new Mac.
For the most part, during the setup process, you can just follow the onscreen instructions. However, once you get to the point where Setup Assistant is asking you, “Do You Already Own A Mac?”, you may want to pause.
Essentially, what happens at this step is you get to choose whether or not you want to transfer your old data from a previous Mac to your new machine, either through Ethernet, Firewire, USB or WiFi. This might seem like a no-brainer, but there’s plenty of good reasons why you might to start as fresh as you can: in particular, complete system transfers can often slow new Macs down thanks to loads of legacy cruft.
image: http://cdn.cultofmac.com/wp-content/uploads/2011/12/migrationassistant-640×463.jpg
![Get Started With Your New Mac – The Right Way [Setup Guide]](https://i0.wp.com/cdn.cultofmac.com/wp-content/uploads/2011/12/migrationassistant-640x463.jpg "migrationassistant")
If you kept your old Mac pretty clean, it’s up to you how you want to proceed. Personally, we recommend a partial migration, in which you just migrate your “Users” folder. You’ll have to reinstall your old apps and adjust your settings again, but you aren’t likely to inherit any slow-down-causing legacy cruft, and you’ll guarantee you only have the latest versions of all software on your machine.
Either way, if you choose to migrate, try to do it over Ethernet or Firewire: USB and WiFi take a lot longer, and aren’t always as reliable.
Okay, you’re almost done. In the final step, however, you’ll learn about how scrolling now works in Lion. This can be confusing, because not only does scrolling on a new Mac work differently than on a PC, it even works differently than on previous Mac operating systems! In this final step, you’ll see how to use the new touch-based gesture system in Lion. Depending on the type of touch-based input device you have (Magic Mouse, Magic Trackpad, or integrated trackpad), you will see a description of how to scroll. Follow the instructions to scroll down through the text area, and click the Start Using Mac OS X Lion button. Don’t worry, if you hate OS X Lion’s “reverse scrolling” feature, we’ll show you how to turn it off in the next section.
Essential Tweaks
image: http://cdn.cultofmac.com/wp-content/uploads/2011/12/software-update.jpg
![Get Started With Your New Mac – The Right Way [Setup Guide]](https://i0.wp.com/cdn.cultofmac.com/wp-content/uploads/2011/12/software-update.jpg "software-update")
Make Sure Your Software Is Up-To-Date: This is a simple one. First thing you should do when you start up your new Mac is click the Apple logo in the top left of the screen, and click on “Software Update,” which will tell you what new software is available for your system.
image: http://cdn.cultofmac.com/wp-content/uploads/2011/08/Trackpad-scrolling-settings-Lion-e1312867193184.png
![Get Started With Your New Mac – The Right Way [Setup Guide]](https://i0.wp.com/cdn.cultofmac.com/wp-content/uploads/2011/08/Trackpad-scrolling-settings-Lion-e1312867193184.png)
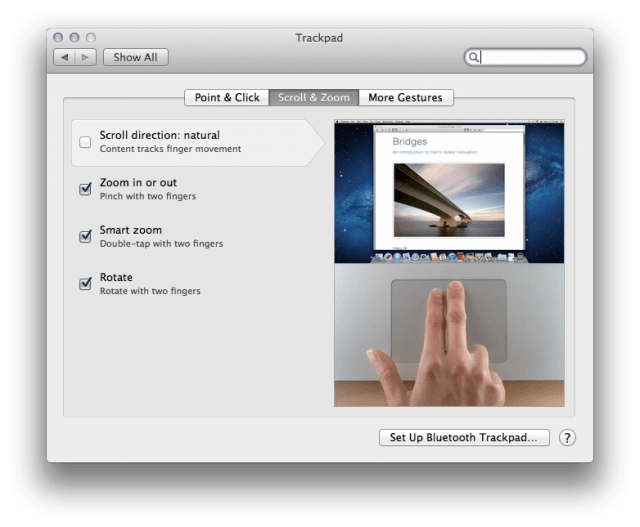
Turn Off Reverse Scrolling: It’s actually quite easy to turn off reversed, or “natural,” scrolling in Lion. All you need to do is change a simple setting in your Mac’s System Preferences.
If you’re on a MacBook or desktop machine with a Magic Trackpad or Magic Mouse, it’s as simple as going to the “Trackpad” menu of System Preferences and clicking on “Scroll & Zoom.” From that window, uncheck “Scroll direction: natural.” Reversed scrolling will be disabled.
If you’re not using a trackpad or Magic Mouse, you can disable reversed scrolling in your “Mouse” options. Uncheck “Move content in the direction of finger movement when scrolling or navigating” and you’re good to go!
image: http://cdn.cultofmac.com/wp-content/uploads/2011/12/Screen-Shot-2011-12-24-at-11.50.37-AM-640×394.jpg
![Get Started With Your New Mac – The Right Way [Setup Guide]](https://i0.wp.com/cdn.cultofmac.com/wp-content/uploads/2011/12/Screen-Shot-2011-12-24-at-11.50.37-AM-640x394.jpg "Screen Shot 2011-12-24 at 11.50.37 AM")
Fix The Dock In OS X Lion, by default, app icons in the dock aren’t animated, and there’s no way to tell which apps are open and which aren’t. To be able to tell at a glance which apps you have open, go to System Preferences > Dock and turn on the option for ” Show indicator lights for open applications” and check the box labeled “Animate opening applications.”
While you’re here, let’s also switch off Dock Magnification. It looks neat when you first use a Mac, but it’s unnecessary bling that tends to get annoying quick. Under Systems Preferences > Dock, untick the “Magnification” box. While you’re at it, you might also want to make the Dock as small as you can stand: a big dock takes up valuable screen pixels!
Finally, by default, OS X puts a crapload of icons in your dock, under the assumption you’ll be using it as a launcher. Personally, we prefer a dock that contains a minimum of icons, defaulting to a small handful of programs that we literally never have closed. We suggest you do the same, dragging the icons off the dock and replacing them with your most used apps. What should you use for launching apps instead? Alfred, which we’ll get to in our essential apps section below.
image: http://cdn.cultofmac.com/wp-content/uploads/2011/12/Screen-Shot-2011-12-24-at-12.01.00-PM-640×568.jpg
![Get Started With Your New Mac – The Right Way [Setup Guide]](https://i0.wp.com/cdn.cultofmac.com/wp-content/uploads/2011/12/Screen-Shot-2011-12-24-at-12.01.00-PM-640x568.jpg "Screen Shot 2011-12-24 at 12.01.00 PM")
Disable Autocorrect — In Lion, OS X defaults to correcting your typos, just like in iOS. The problem? OS X isn’t really very good at figuring out what’s a typo and what isn’t, and when OS X “fixes” typos, it does it invisibly, without alerting you to the fact. Irritating. Turn it off by going to System Preferences > Language & Text > Text and untick “Correct spelling automatically”
image: http://cdn.cultofmac.com/wp-content/uploads/2011/12/Screen-Shot-2011-12-24-at-12.51.51-PM-640×498.jpg
![Get Started With Your New Mac – The Right Way [Setup Guide]](https://i0.wp.com/cdn.cultofmac.com/wp-content/uploads/2011/12/Screen-Shot-2011-12-24-at-12.51.51-PM-640x498.jpg "Screen Shot 2011-12-24 at 12.51.51 PM")
Turn Off Dashboard As A Space – By default, OS X Lion now includes Dashboard — OS X’s widget center — as a virtual space within Mission Control, which allows you to see an overview of everything that’s running on your Mac. It’s not a big deal, but it can be annoying: toggle the option off by going to System Preferences > Mission Control and unticking “Show Dashboard as a space.”
Essential Apps
![Get Started With Your New Mac – The Right Way [Setup Guide]](https://i0.wp.com/cdn.cultofmac.com/wp-content/uploads/2011/12/vlc.jpg)
There are a multitude of apps you can use on your new Mac. We’ve done numerous features on this, but here’s our list, boiled down to bare essentials.
- Growl: Adds a simple notification system to OS X so that apps can report when they’ve finished a task, for example. Plugins are available for many built-in OS X apps, and lots of third-party apps support Growl too. Available for $1.99 from the App Store.
- ClamXav: Adds on-demand virus scanning to OS X. Unlike other antivirus programs, ClamXav doesn’t remain present in memory. You can run it to scan any files that look suspicious, such as those you’ve downloaded from a less reputable website. Available free of charge via the App Store. (See also Sophos Antivirus for Mac, which provides resident scanning and is free for home users.)
- The Unarchiver: Significantly expands OS X’s knowledge of compressed file formats, specifically adding in the ability to expand RAR, 7-zip, LhA, and StuffIt formats. Expands files in a fuss-free way just like the built-in compression tool. Free of charge via the App Store.
- Little Snitch: OS X already has a powerful firewall protecting your computer from inbound connections, but Little Snitch adds outgoing firewall protection to OS X. This lets you control which apps have access to the Internet and thereby potentially put a block on malicious software or just stop software from “phoning home.” Little Snitch can be purchased for $29.95 from the author’s website.
- uTorrent: There are a variety of BitTorrent clients for OS X, but this is perhaps the most fully featured and is frequently updated with new features. It’s a free of charge download from the developer’s website.
- Cyberduck: File transfer program that works with FTP, SFTP, WebDav, Amazon S3, Google Storage (including Google Docs), Microsoft Azure, and Rackspace Cloud Files. Can be purchased via the App Store for $23.99, but a free-to-try “donationware” version is available from the website.
- iWork: Apple’s own office suite, consisting of Pages (word processor), Numbers (spreadsheet), and Keynote (presentations). All are packed with features plus the ease of use and excellent design expected of Apple products, but, perhaps crucially, the apps also integrate 100 percent with OS X Lion’s features, such as Versions. There are versions of the iWork apps available for the iPhone/iPad too. Each component of iWork for OS X is purchased individually from the App Store for $19.99.
- VMwareFusion: Creates virtual computers within software that let you run Microsoft Windows, Linux, or even additional installations of OS X Lion. Fusion is useful if you need to run some Windows software or games but not enough to warrant a full BootCamp installation of Windows, and you can also access pre-built machines sometimes offered for download. VMware Fusion is currently available for $49.99 from the VMware website.
- Adium: Instant messaging client that supports just about every chat protocol in existence and integrates fully with OS X’s Address Book. Free download from the developer’s website.
- VLC: Your Mac’s support for video and audio files is pretty good but there’s still a handful of files that catch it out. The solution is to use VLC, which is an entirely separate player application that supports just about everything. It’s a free download from the developer’s website. (See also the free of charge Windows Media Components for QuickTime add-on, which brings support for viewing Windows media files to OS X, and Perian, which adds support for various other media file formats to QuickTime and is again free of charge.)
- 1Password: 1Password on the Mac acts as your personal vault for storing sensitive information like passwords and credit card numbers. Not only can you store your logins and have them automatically filled in when browsing online, but 1Password will encrypt your database to keep it protected like Fort Knox.
- Alfred: We’ve covered the 1.0 release of Alfred extensively on the site, and it’s clear that Alfred deserves to sit amongst the top ranks of innovative Mac apps for 2011. The lightweight launcher utility makes operating a Mac delightful, and there’s plenty of available plugins for fine tuning your experience. Don’t let the cute hat fool you, Alfred doesn’t mess around — it gets stuff done.
- Evernote/strong>: If you aren’t already using Evernote, you’re missing out on a robust, streamlined productivity tool for managing your digital life. The note-taking/to-do app is available on every platform imaginable, and the Mac app acts as the hub for collecting information and entering large amounts of data.
Essential Accessories
image: http://cdn.cultofmac.com/wp-content/uploads/2011/12/thunderboltdispalypfprint.jpg
![Get Started With Your New Mac – The Right Way [Setup Guide]](https://i0.wp.com/cdn.cultofmac.com/wp-content/uploads/2011/12/thunderboltdispalypfprint.jpg "thunderboltdispalypfprint")
image: http://cdn.cultofmac.com/wp-content/uploads/2011/12/bookbook.jpg
![Get Started With Your New Mac – The Right Way [Setup Guide]](https://i0.wp.com/cdn.cultofmac.com/wp-content/uploads/2011/12/bookbook.jpg)
Thunderbolt Display – If you need an external display for your Mac or MacBook, this is the best one you can possibly get. No surprise, it’s made by Apple themselves, and while it’ll cost you a pretty penny, this is a display you’ll have for years, and it even operates as a Thunderbolt hub for all your other devices.
BookBook Case – We’re pretty big fans of the BookBook case case, whether it’s the version for MacBook Air, Pro, or iPad. As we once wrote, “What the BookBook Case does is make a connection with people who have a good sense of humor about things, and intuitively realize that there’s something silly about decking out a laptop like the MacBook Air to look like a prop from Gandalf the Grey’s library. Sure, the BookBook Case is cool looking, but it’s also funny. It’s an irony against pseudo-intellectuals and literary posers. It’s a joke.” We love it.
image: http://cdn.cultofmac.com/wp-content/uploads/2011/12/plugbug.jpg
![Get Started With Your New Mac – The Right Way [Setup Guide]](https://i0.wp.com/cdn.cultofmac.com/wp-content/uploads/2011/12/plugbug.jpg)
PlugBug – Seriously, what took so long for someone to come up this simple solution? The PlugBug is a totally unique, all-in-one, dual charger for MacBook + iPad or iPhone. Freeing up an extra electrical socket, the PlugBug provides enough juice to charge two of your Apple gadgets while decluttering your space. It’s a great solution for those of us that get tired of carrying around two power adapters and hate looking at the mangled mess of cables near the electrical socket.
image: http://cdn.cultofmac.com/wp-content/uploads/2011/12/BookArc_setup_headerimg_large-640×289.jpg
![Get Started With Your New Mac – The Right Way [Setup Guide]](https://i0.wp.com/cdn.cultofmac.com/wp-content/uploads/2011/12/BookArc_setup_headerimg_large-640x289.jpg "BookArc_setup_headerimg_large")
BookArc — If you have any interest in docking your Mac laptop with an external keyboard or monitor, the BookArc is the best-of-breed solution, with a style even Jonny Ive would love.
image: http://cdn.cultofmac.com/wp-content/uploads/2011/12/Twelvesouth-MagicWand-640×393.jpg
![Get Started With Your New Mac – The Right Way [Setup Guide]](https://i0.wp.com/cdn.cultofmac.com/wp-content/uploads/2011/12/Twelvesouth-MagicWand-640x393.jpg "Twelvesouth-MagicWand")
If you’re using Apple’s Bluetooth Keyboard and the Magic Trackpad with your Mac desktop or laptop, Twelvesouth’s Magic Wand will cleverly unite them into one device. How does it work? It’s a half-cylinder bracket that snaps along the battery case, tightly uniting the keyboard and trackpad when placed side-by-side in either righty or lefty configuration. Great for keeping your desktop tidy, especially for just $29.99.
sourse: Get Started With Your New Mac – The Right Way [Setup Guide] | Cult of Mac.
 .e-shop.gr/
 Aegean Airlines. Low fair Calendar
 aliexpress. New arrivals
 attica The Department Store
 , η οποία αποτελεί την εξέλιξη στις εταιρείες παράδοσης δεμάτων, αξιοποιώντας την κ") BOX NOW
BOX NOW e-Fresh.gr
 E-gadgets
 epapoutsia.gr
 Ianos
Ianos ΑΒ Βασιλόπουλος
 Moustakas Toys
 public.gr
 SpotMechanic
 Terra Nation. Your Beach Partner
 The Body Shop: φυσικά προϊόντα περιποίησης και ομορφιάς
 Lightgear
 Airshop.gr. Ταξίδια προσφορές
 Car 'n Motion. Ενοικίαση αυτοκινήτου χωρίς πιστωτική κάρτα, χωρίς εγγύηση, με πλήρη ασφάλεια και απεριόριστα χιλιόμετρα
 Ekdromi.gr: προσφορές ξενοδοχείων και ταξιδιών με εξαιρετικές εκπτώσεις!
 Coins Club


![Get Started With Your New Mac – The Right Way [Setup Guide]](http://cdn.cultofmac.com/wp-content/uploads/2011/12/2948959526_753bafc515_z.jpg "2948959526_753bafc515_z")
![Get Started With Your New Mac – The Right Way [Setup Guide]](http://cdn.cultofmac.com/wp-content/uploads/2011/12/migrationassistant.jpg "migrationassistant")
![Get Started With Your New Mac – The Right Way [Setup Guide]](http://cdn.cultofmac.com/wp-content/uploads/2011/12/software-update.jpg "software-update")
![Get Started With Your New Mac – The Right Way [Setup Guide]](http://cdn.cultofmac.com/wp-content/uploads/2011/12/Screen-Shot-2011-12-24-at-11.50.37-AM.jpg "Screen Shot 2011-12-24 at 11.50.37 AM")
![Get Started With Your New Mac – The Right Way [Setup Guide]](http://cdn.cultofmac.com/wp-content/uploads/2011/12/Screen-Shot-2011-12-24-at-12.01.00-PM.jpg "Screen Shot 2011-12-24 at 12.01.00 PM")
![Get Started With Your New Mac – The Right Way [Setup Guide]](http://cdn.cultofmac.com/wp-content/uploads/2011/12/Screen-Shot-2011-12-24-at-12.51.51-PM.jpg "Screen Shot 2011-12-24 at 12.51.51 PM")
![Get Started With Your New Mac – The Right Way [Setup Guide]](http://cdn.cultofmac.com/wp-content/uploads/2011/12/thunderboltdispalypfprint.jpg "thunderboltdispalypfprint")
![Get Started With Your New Mac – The Right Way [Setup Guide]](http://cdn.cultofmac.com/wp-content/uploads/2011/12/BookArc_setup_headerimg_large.jpg "BookArc_setup_headerimg_large")
![Get Started With Your New Mac – The Right Way [Setup Guide]](http://cdn.cultofmac.com/wp-content/uploads/2011/12/Twelvesouth-MagicWand.jpg "Twelvesouth-MagicWand")


